ATA Security eXtension BIOS
Deutsche Version
Intro:
The most modern ATA- and SATA hard disks (IDE=ATA) support the "ATA Security Mode Feature Set".
This include special functions to:
- protect the hdd for illegal access and
- prevent the unauthorized set of a new password (by a Virus or other malware)
These "ATA Security Mode Feature Set" functions were originally developed for Laptops / Notebooks.
Since Microsoft has used these functions for the XBOX, the most 3.5" hard disks support them.
The BIOS versions of the most computers has no or only partial support of the "ATA Security Mode Feature Set" functions.
This is a security hole that is usable for malware which can set a hard disk password in background to
lockout the user after the next power on and prevent the loading of the Operating System and any further hard disk access.
The "Heise Verlag" has published a really interesting article about hard disk security in the c't 8/2005 - article: "AT Your Disservice"
It is suggested to check the computer and if necessary to update your BIOS.
Because many mainboard vendors update their BIOS versions only for a short time, I have written a BIOS Extension that
- starts on boot
- supports the "ATA Security Mode Feature Set" and
- freezes the functions to prevent malware from setting a password.
So, the ATASX (ATA Security eXtension) BIOS was introduced.
This BIOS Extension can be integrated in a PC/Notebook in two methods.
Download:
ATA Security eXtension BIOS v2.11 [56.0KB] 08.08.06
(free for individual use)
Older Versions:
ATA Security eXtension BIOS v2.10 [55.7KB] 01.08.06
(free for individual use)
ATA Security eXtension BIOS v2.02 [55.0KB] 06.05.06
(free for individual use)
ATA Security eXtension BIOS v2.01 [23.3KB] 23.12.05
(free for individual use)
ATA Security eXtension BIOS v2.00 [23.2KB] 03.10.05
(free for individual use)
ATA Security eXtension BIOS v1.00 [9.2KB] 27.06.05
(free for individual use)
other Tools:
ADDATASX v2 [6.6KB] 09.08.06
Tool to merge the ATASX Code to an other Option-ROM
Preparation:
The ATASX BIOS is provided in a not configured format.
It has to be setup before it can be adapt in some simple steps to your hardware.
This can be done with the included program: BROMCFG
With BROMCFG
- the ATASX BIOS will either be saved as PCI or as ISA Extension BIOS
- a default hard disk password can be set ("XBOX-Mode" :D)
- a setup password can be set
- the time to wait for ATASX BIOS accelerator: "CTRL+S" will be defined
- the final configured ATASX BIOS file can be filled to common E/EEPROM sizes. (/sxxx)
If a PCI Extension BIOS shall be used, BROMCFG
asks for the Vendor ID and Device ID. So, you need the four numeric character IDs of the used Network board with the BootROM socket for the ATASX BIOS.
Vendor ID and Device ID can be read in the manual and/or got from vendor via telephone/eMail. Also some hardware diagnostic programs, like PC-Analyser, Dr. Hardware or Everest show the IDs.
The Vendor, Device IDs and names of (all) the devices in your computer will also be shown on boot.:
ATASX BIOS as "PCI Extension BIOS":
- normally required by PCI Network cards --> Method 1.
- can also be used in Method 2 - especially on AMIBIOS.
ATASX BIOS as "ISA Extension BIOS":
- required by ISA network cards --> Method 1.
- predominantly on integration to an Award, Phoenix - Award and Phoenix BIOS --> Way 2.
Method 1 - ATASX BIOS as network BOOTROM
Many network cards have a socket, for small memory chips (ROMs, PROMs, EPROMs, EEPROMs/FLASH-(E)EPROMs)
In normal condition a memory chip is already installed and programmed with a software (Firmware, BOOTROM, ETHERBOOT),
to support a system boot over network from another computer.
This memory can also be used to integrate other executable Code, in this case the ATASX BIOS, to run on boot.
Network cards should be supplied with a driver package. In this package there should be a small tool to write to
the BOOTROM chip. This is normally used for software updates of the BOOTROM firmware.
With this program the ATA Security eXtension BIOS will be written to the BOOTROM chip.
After a sucessful programming, the ATASX BIOS is available at every boot.
If not, you have to activate the ability to boot from network card
- in the Mainboard BIOS Setup or
- with the configuration tool of your network card
If you have got a P-/EP-/EEP-/FLASH-EP-/FLASH-EEP- ROM programmer, it can also be used to program the ATASX BIOS to the BOOTROM chip.
Notes:
Pro:
+ Method 1 is a simple and cheap one to add and use a ROM Extension to/with a PC.
+ The ISA/PCI network card with the ATASX BIOS can be shared with and integrated into other ISA/PCI mainboards.
Contra:
- You need a network card with a BOOTROM Socket and BOOTROM chip.
- The fact about the portability of a network card is not so good for the mainboard and the network card itself.
- Not usable for notebooks.
Method 2 - ATASX BIOS as part of the mainboard BIOS
The most of available BIOS files/updates are similar to a packed archive, it consists of packed modules with different functions.
- System BIOS
- language file
- AntiVirus module
- PCI/ISA Extension BIOS module(s) for onboard components,
like: onboard RAID Controller, ~ network cards, ...
- OEM-Logo
...
The Award, Phoenix - Award and Phoenix BIOS still have the abilities to integrate a "ISA Extension BIOS" module. In this case the ATASX BIOS can be used as "ISA Extension BIOS" without any problems.
The AMIBIOS has no possibility to add a "ISA BIOS" module.
Here you can use the ATASX BIOS only as a "PCI Extension BIOS" for adding it to an AMIBIOS.
This requires that the ATASX BIOS, stored as a "PCI Extension BIOS" using BROMCFG, has the same Vendor and Device ID like the real device on the mainboard.
Example:
A computer with an AMIBIOS has a (onboard)/PCI network card (without BOOTROM chip)
with Device ID 1234 and Vendor ID 5678.
To use the ATASX BIOS you have to configure it with BROMCFG as a "PCI Extension BIOS" with the Device ID 1234 and Vendor ID 5678 to integrate it to the AMIBIOS.
Award BIOS / Phoenix - Award BIOS
Necessary tools:
CBROM / CBROM32, backup image of the mainboard BIOS / BIOS Update file.
Copy the configured ATASX ISA BIOS or ATASX PCI BIOS, CBROM and the mainboard BIOS file to a working directory and run the dos shell.
Change to the working directory and read the CBROM commands and help page.
CBROM /? >Enter<
Now add the ATASX-BIOS as ISA/PCI-BIOS-Modul to the mainboard BIOS file.
After this, a flash of the modificated mainboard BIOS file to the mainboard's "BIOS chip" is necessary.
For additional information about integrating the ATASX BIOS to a mainboard BIOS,
you can get in contact with Borg Number One here.
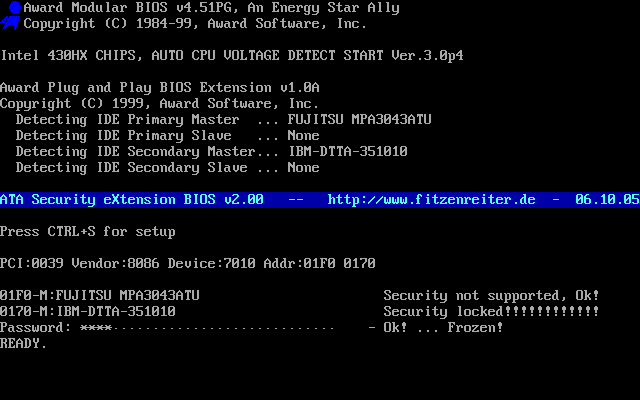
Now the computer should show the extension at boot:

|
Click for source photo.
|
The Fujitsu hard disk doesn't support the ATA Security Mode Feature Set.
The IBM hard disk is password locked with a password so the ATASX ask for it.
|
Press CTRL+S to enter the ATASX BIOS Setup
At this place you can change the security settings of you hard disks.
Check also the FAQ of Heise, (Sorry it was/is not released in English.)
And also my Forum(You can post your questions and suggestions in German and in English.)
You can contact me via the message-system of my forum.
Go to forum
Links
BNOBTC - Borg Number One Bios Tools Collection
Hints and tools to integrate own modules to mainboard bios
K6-2 with additional Highpoint 370 Controller
A7N8X-E with nVidia P-ATA and SiI 3112 S-ATA Raid on board
MSI Neo2-F with nVidia P-ATA and 4x nVidia S-ATA (Raid) on board
Old 486 without PCI Bus, ATASX BIOS scannt 01F0 and 0170
Thx to: Borg Number One for
- regenerating the pictures from photos.
- extreme rework of this page
(Old-Version)
back to mainpage
Without the authors permission, it is specifically prohibit to use instructions, examples, information, tutorials or single/complete parts from this homepage for commercial and/or official purposes.
If you are interested in publishing the mentioned ATASX related instructions/information in magazines or other homepages, then do not hesitate to get in contact with me.
Warning! No warranty at all. YOU should know what you do.


